Recipe Search

Showing posts with label Special Occations. Show all posts

Sunday, June 6, 2010

A Wedding Cake for a Friend

Things happen for a reason. Two lovers meet and fall in love. Throughout their time spent together most celebrations are accompanied by cake. This is were I come in. I am no cupid but I like to think that two lovers smile a little brighter sharing a big bite of cake, it brings the kid out in all of us.

Recently, I was honored to provide that smile for a friend of mine and her hubby. The bride enjoys the simple things in life; being outdoors, nature, her family and...chocolate. Her cake reflected her special day, although it wasn't a chocolate cake as I thought it might, it was a cake perfect for their occasion.

We did cake tastings about 3 weeks before the wedding. Every couple should enjoy that part of the wedding planning (see Babycakes for photos) no matter how intimate the wedding. I made small 4-6 inch cakes of Red Velvet Wedding Cake, two versions of Lemon Raspberry and a Lemon Merange.  Although wedding cakes covered in fondant look clean and elegant the bride preferred the cake to be decorated with buttercream with a few small details.

Wild flowers from her bouquet was the star of their wedding cake. They enjoyed a lavish two tier Lemon Raspberry Cake with Lemon Buttercream Frosting. I made a 9 inch two layer cake for the bottom tier and a 6 inch two layer cake for the top tier that they will enjoy on their 1st anniversary. The cake was approachable yet delicate, simple yet fully decorated and of course tasted just as good, hopefully better, than it looked. 

The best part of making the cake was the connection I got to have with the bride and groom.  I loved every second of making this cake and would do it again in a heartbeat. Here are a few pictures of the assembly of the cake and two gorgeous pictures of the final masterpiece.


Frosting the layers and setting the dowels
Stacking the layers
Beaded buttercream around both layers


Photo taken my Bethany Kazmar

Friday, March 5, 2010

Happy Birthday Honey B Cake

Beehive cakes are absolutely adorable and very fitting especially if the birthday girl is named B. I call her honey bee which I am sure her parents thought of first. Darling, Beatrice Piper was born to parents Tim and Jenn, the hippest, happiest, healthiest parents on the block.

The cake was made with organic ingredients and clover honey that we picked up at our local farmers market. The cake was delicious, B absolutely loved it and I would make it again in a heart beat. Maybe suitable for Easter or B's 2nd birthday?


Tips: I know this recipe may seem like a lot but if you have all your ingredients in a row as I like to say, its not at complicated as it may seem. I would say this is level intermediate. You might want to keep some extra icing to serve with sliced cake.

This recipe requires a Nordicware Bee Cake pan. Make sure to greese it well and flour it before putting the batter in.

Honey Lemon Beehive:
16 Servings

Ingredients:

For the cake:

  • 2 3/4 cups all-purpose flour
  • 1 1/2 tsp. baking powder
  • 1/2 tsp. salt
  • 16 Tbs. (2 sticks) unsalted butter softened
  • 1 1/4 cups granulated sugar 
  • 1/3 cup honey
  • 4 eggs, lightly beaten
  • 1/2 tsp. vanilla 
  • 3/4 cup milk
  • 2 tbs fresh lemon juice

For the honey icing drizzled on top:

  • 1 1/2 cups powdered sugar
  • 1 tbs honey
  • 1-3 tbs milk

For the buttercream frosting for the cake center:

  • 1/3 stick unsalted butter softened
  • 1 1/2 cups confectioners' sugar, sifted
  • 1-2 tbs milk
  • 1/4 tsp vanilla

For the royal icing for the bees:

  • 1 tbs dried egg white powder or meringue powder
  • 1 1/4 cups powdered sugar
  • 2 tbs water
  • Yellow and black food coloring

Directions:

Have all the ingredients at room temperature.

Heat oven to 300°F. Grease and flour a beehive cake pan; tap out excess flour.

To make the cake, sift together the flour, baking powder and salt; set aside.

In a large bowl or stand mixer, beat together butter, sugar and honey, scraping bowl often.  Add eggs one at a time, blending well after each addition. Stir in vanilla. Reduce speed to low and gradually add flour mixture, alternating with milk, mixing just until blended. Blend in lemon juice. Divide batter evenly among halves of pan,
spreading the batter so the sides are higher than the center. Bake at 300 degrees for 50-60 minutes, until toothpick inserted comes out clean. Cool 15 minutes in pan. Invert onto cooling rack and cool completely. 

To make the buttercream, in a medium bowl, using a handheld mixer, beat the butter on medium speed until smooth and creamy, about 1 minute. Add the confectioners' sugar, milk, vanilla and salt and continue beating until light and fluffy, 2 to 3 minutes more. 

To make the honey bees: In a small bowl combine egg white powder, powdered sugar and water. Beat on medium speed, 5 minutes, until icing forms stiff peaks. Divide icing into thirds; leave one-third of icing white; color one-third black and the remaining one-third yellow. Fill a piping bag fitted with a #3 tip with black icing. Pipe bodies and heads of honeybees onto parchment or waxed paper; let set 10 minutes. Fill a piping bag fitted with a #1 tip with yellow icing; pipe stripes onto bodies of bees. Fill piping bag fitted with a #3 tip with white icing; pipe wings onto pees. Let stand at least 2 hours, until hardened - this is very important! 


To make honey icing: In a medium bowl, combine all honey icing ingredients; bland well, adding milk until icing is consistency of very thick cream.

To assemble the cake: Stand one-half of cake upright; using a serrated knife, level off the flat side of cake by trimming off rounded dome; repeat with other half of cake. Spread buttercream frosting over cut side of cake; gently press cake halves together to secure. Place cake on serving plate. Spoon honey icing over cake, covering side seams. Decorate with honeybees.


Bake on, 
Sarah


Thursday, February 11, 2010

Queen of Hearts

What do you do to show the one you love just how much you love them? I certainly don't wait until Valentines day, one specific day of the year to show the ones I love just that I do. And how do I do that you might ask? Baked goods baby!


This Valentines I was inspired most by two things, the upcoming opening of Tim Burton's Alice in Wonderland and the 2006 Summer issue of Donna Hay Magazine. This issue inspired me to bake when I was studying abroad in Australia in 2006 and still is the most inspirational magazine for the baker in me. Everything from the recipes, the themes and most importantly the food photography. Check it out sometime. Now you ask what these two have in common? Well, I did my best to recreate it and hopefully I did Donna Hay justice. Let the pictures roll.


Caramel Paddies made with puff pastry


Chocolate Heart Cookies with Royal Icing

Blueberry, Pear Heart Pies

Tea Time Brownies dusted with powdered sugar

Lovely Citrus Cupcakes with Cointreau Icing


Will you be my Valentine? 
Love, Sarah

Wednesday, December 30, 2009

Christmastime is here again!

Every year I plan to make a lot of my holiday gifts from scratch or by hand. Gifts tend to be more from the heart and sentimental when you make them yourself. This year I planned and actually accomplished making cookie boxes for close friends and family and small truffle boxes filled with goodies as stocking stuffers.

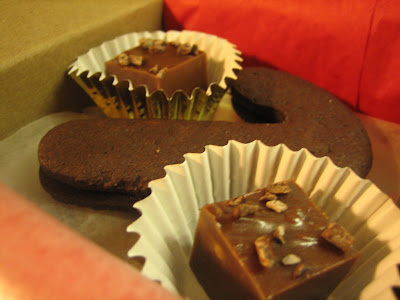
The cookie boxes included recipes from my favorite chefs. Chewy Ginger Cookies, Grandma Doyle's Sugar Cookies, my favorite Coconut Macaroons, Chocolate Holiday Cookies and Chocolate Caramels. My favorite part of all this is the presentation, assembling the boxes, wrapping the caramels in festive wrappers and putting the cookies in cupcake liners. It really ties a cookie box together.

Carmels and Macaroon Truffle Boxes


I know at times it may seem overwhelming, trust me, at one point I couldn't stop working. I had glitter all over the floor, double stick tape stick to me while pulling cookie batch after cookie batch out of the oven. My suggestion to you in times when it just doesn't seem possible to make a lovely gift when its a whole lot easier to go buy something...assembly line baby! Making something is way better for your soul, your receivers heart, and all around better for mother nature. Here's how:
  1. Choose a box that fits well with what you want to put in it and how you want to ship/give it.
  2. Pick out festive papers and stickers for labels with a special touch
  3. Embossing makes your crafts pop of the paper. You can find the powder and heat gun at your local craft shop
  4. Pick a paper to line the inside of the box. This can be a tissue paper or parchment. I use wax paper because my Grandma wrapped everything in wax paper
  5. Organize an afternoon of baking. I split the days in half, make all of the dough on day one and bake all the cookies on day two.
  6. Assembly line! Build all your boxes, make and apply your labels, line all your boxes and fill them up.
Here are some photos of what I did this Christmas.

Layer 1


Layer 2


Layer 3


Final Cookie Box

I hope your holidays are full of warm cookies, sweet cakes and family and friends. Happy Holidays from the Mixing Bowl!

Wednesday, November 4, 2009

Can Cupcakes be Haunted? Naaa...

Terrific Trio of Terrifying Treats!

Halloween is one of my favorite holidays. I love the spooks, the sweets, and the season all together. This Halloween I made cupcakes for a friend. The order: 30 vanilla cupcake for a parents Halloween party. Kids like candy, kids like cupcakes so I put them together. I also got some great ideas from Martha Stewart's website to suite the parents as well.

I have to be honest, I tried the witch cupcakes. I cut the tops off sugar cones and dipped them in chocolate, made green buttercream frosting and with an assortment of candies for topping I made an assembly line for easy decorating. I actually spent a lot of time on this idea to find out that I made the wrong kind of frosting to hold that weight of decorations. The frosting was too smooth and light to hold up the candies. So if you are going to make witch cupcake next year I recommend using a very thick frosting that doesn't get soft. Be careful, your witch can closely resemble an owl which wouldn't be a bad idea for Thanksgiving.

I went with the Ghooley Ghost, Fun Frankenstein and Black Widows Web. These were all really fun to make. I used a standard Vanilla Cupcake recipe with a buttercream frosting. A few tips: I used electric green food coloring for the frosting so it didn't resemble a Christmas green. I recommend making some of the details with a fine piping bag and black frosting and to experiment with different candies. No matter what the recipe calls for, a little bit of black licorice goes a long way. The critique: The kids voted for the Fun Frankenstein and the candy cups probably because he had the most candy on top. As my favorite animated orange cat would say, "Candy, candy, candy candy!"


Fun Frankenstein:
Electric Green buttercream frosting, sour straws for mouth, caramel candy corns
as bolts, Halloween M&Ms for eyes and black licorice for stitches and nose.


Ghooley Ghost:
Buttercream frosting piped on with an Ateco 809 for height,
black Halloween M&Ms for eyes, black icing applied with small
piping bag for mouth and black licorice for brow.


Black Widows Web:
Electric Green buttercream frosting with black frosting piped on and
pulled with a toothpick and black licorice or red vines for spider legs.


To package them I used black tissue paper and put the cupcakes in a standard cupcake holder. For a friend that's fine, normally I would use my Mixing Bowl stamp and boxes. As a special touch I placed cupcake liners of assorted Halloween candy in between the cupcakes to keep them from bumping into each other. An overall success.